Showing posts with label home decor. Show all posts

17.2.12

Fabulous Friday Tip...

It makes me giggle a little that this is what I'm sharing...seeing as how I am currently un- decorating our home to stage it to sell...BUT I just love this so much that I just HAD to share it!! So, here goes...
my good Friend Kristen Duke is doing a "Decorating with Portraits" Series on her Blog that I just LOVE...It has some really great tips and ideas from bloggers across the globe on how to use your photos to decorate your home in SO many different ways. Some of my faves are:

From THIS POST ,  Becky Higgins's Blog  gives you a 'how to' on hanging perfect photo grids (which I have done and it is HARD to get it just right)

Another fave:
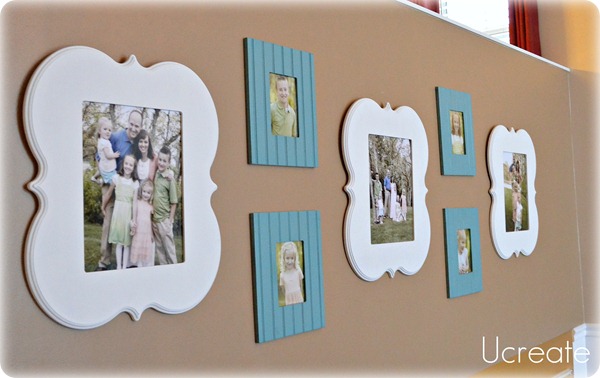
from THIS POST by Ucreate , these frames are pretty pricey, though I think you can find some that are unfinished with out the glass for MUCH cheaper

 
I LOVE this GIANT/budget friendly photo tutorial because of how much of an impact it makes for such a small dent in your wallet! (from this post
Same gal from SugarBeeCrafts does this one. I totally want to do this! My kids would love it!
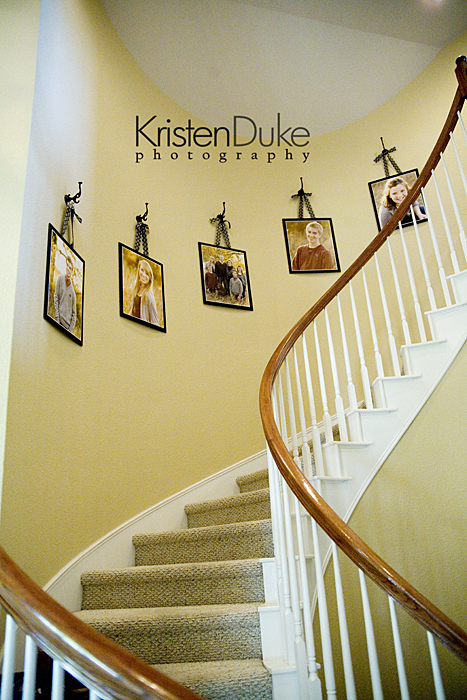
THIS ONE  is from a family in our ward that Kristen photographed. I particularly love this one right now because the home we are hoping to move to has a curved stair case like this one and I'm thinking I will do something like this.

and here's my sad attempt at demonstrating how we have used our portraits to decorate OUR home...you get the idea right? (excuse the poor quality...I took these on my iphone this morning and it was really overcast outside...normally our home is a little brighter than that!:) The family photos are canvases that I got from canvas people, the one on the bottom right is next to our "family rules" subway art. the kid portraits are just large 11x14 prints in some classic gallery frames from Michaels (50% off deal) These are kind of basic I know...I'm hoping to do more variety and incorporate some more color  and texture when I'm back into "decorating mode" again;)


My kids (and Mike and I too ;) just LOVE seeing photos through out our home of our family, it really helps us feel more unified and just confirms to us that even when we are feeling grumpy or having a bad day that we DO have a family and that we DO love each other!! I hope these ideas can inspire you to print your photos and use them in creative and inspirational ways to beautify your home! Happy Friday everyone!!
(here's a link to the whole line up from last year and the current series of posts)

1.7.11

Linky Love and the finished high chair

I contribute to a little blog called 'Save the Date for Us'. It's a place for a few friends to record our dates with our husbands. The goal is to go on one date, every week, for a year. I absolutely LOVE being a part of this project and I'm so thankful to have been invited! Although I'm behind the other girls (because I started a couple months in), the Mr. and I have gone on so many fun dates! Before joining in, date nights were a thing of the past for us. It just wasn't a priority. Now, we make time for it and we have a lot of fun thinking of what we're going to do each week, even if it's just a quick date in the living room, after the kids go to bed. DATE NIGHT has taken on a whole new meaning.

Last week, for our date, we picked out some paint for the high chair that I mentioned in my last post. We found this high chair at the antique store, for $25. We sanded it down a bit, applied a coat of primer and two coats of paint (Royal, 'Waffle Cone').

BEFORE


AFTER


AH!! So fresh. I'm loving this and can't wait to see my little Sweet P in it. I just finished this today and she's taking a nap, but we'll be using it by dinnertime!!


For my next project, I'd love to make a little seat cover for this. I know it's kind of a random project, but if anyone has seen a tutorial out there that could help, just point me in the right direction!

26.6.11

A little fun with furniture

We made a stop at the antique store and found SO MANY things that we LOVED, but we settled for this desk (and a cute little high chair. Pictures of that, later).

Photobucket

Photobucket

We made it out of there for under $60!! Talk about GOOD prices! The desk was only $25!!
It's from The Peabody-Stiggleman Co., so I imagine it must have been sitting in a schoolhouse over 100 years ago. Pretty cool!

Photobucket

We didn't need to make a big change. We really just wanted to see the natural wood, so we sanded it down and then put a couple coats of varnish on. Now it's nice and shiny. Beautiful. I'm so happy to be rid of that paint!

Photobucket

I love all of the little marks and imperfections. There were a lot of spots that wouldn't sand down very well, so there's still some of that green paint in spots, but I wasn't trying to make it look brand new. I couldn't be happier with the outcome.

Photobucket


Photobucket


Photobucket

Photobucket

Now my Colsie has a place to do his schoolwork, other than the couch, where he used to end all of his lessons in the supine position.

Photobucket

1.5.11

Coffee Table with Wheels

I mentioned ana-white.com before, in this post.

We loved the look of THIS unconventional, factory cart, coffee table on her site, so we (and by 'we' I mean Hubba) built one, adjusting the instructions to our own needs.

Factory Cart Coffee Table


We can ALWAYS use more storage, so he made the top with hinges, to store some books inside.

The wheels gave us the most trouble. I'm pretty picky when it comes to our projects. When I like the look of something, I'm not going to settle for less than perfect. I believe that, if it's not going to look like the picture, it defeats the purpose of building it yourself. You might as well shell out the money for the original. If you're going to cut cost by making it yourself, you don't want it to LOOK like you made it yourself. I LOVE when people come over and ask where we bought our bookshelves. That means we did our job.

Photobucket

Anyway, the only similar casters we could find were antique, heavy duty ones, which I LOVED, but they were WAY beyond our budget. We were -this close- to just buying the expensive ones, when Hubba worked his magic and found THIS site. He searched "cast iron", and found some four-inch casters for about $12 each (as opposed to the antique ones, for $40+ each). They were brand new, and shiny, which is NOT what we wanted, so we spray painted them with Rust-Oleum Hammered paint in black, and I'm really happy with the outcome.


Photobucket

27.1.11

Blog Love

My friend told me about All Things Thrifty and I spent way too much time on the internet afterwards. It's filled with fun projects and how-tos, from reupholstery to glazing furniture.
I'm so excited to try some projects inspired by this blog!


22.3.10

Eye Candy

I'm drooling. . . .


{photos courtesy of coco+kelley}

4.11.09

Warm Pink and Beige

This color combination is breathtaking. I especially love soft, neutral tones in bedrooms. It creates such a peaceful atmosphere. And that's just what you want in a bedroom.


{pictures here}