Showing posts with label sewing. Show all posts

4.11.12

MADE: grocery bag dispenser, goo, and a craft

We've been MIA here for awhile.  Sorry.  No excuse other than I just get caught up in other things sometimes.

Husband commissioned me to make something that would solve the problem that WAS our pantry overflowing with plastic grocery bags, so I made this grocery bag dispenser from the tutorial on Make It-Love It.   I just used a single piece of fabric to save time (she sews a few different fabrics together, in stripes)

Extremely easy.  

I hung it on the pantry doorknob but it just seemed too low, so I hung it on the hinges.  It's cute enough to be showing and I'm just happy the kitchen is somewhat more organized.


You know me.  I don't like to make a trip to the store for anything if I don't have to, so I used lace for the ribbon, because I didn't have any ribbon.  Works just fine.


..........................................................

I've been on a mission to do more fun things with and for my kids, so we made this goo (from Our Best Bites) that I had been promising G we'd make every day for at least a couple of weeks.  We finally did it yesterday.  I'm still working on the procrastination thing, but I think it's a worthy enough goal.

It entertained them for quite some time.  I put a big piece of freezer paper down on the kitchen floor for them to smash it down on.  They had a friend over when we made it, and they got tiny toys and cars out, to 'bury' in the goo.  They loved it.  (didn't get any good pics)  Here's a different recipe at Tot Treasures, if you don't want to buy Borax.

We put it in a ziploc baggie so they can play with it again and again.


And then there was this 'mess-free finger painting' idea, I saw on Mama Smiles.  They loved this too.  Put some tempera paint in a freezer ziploc baggie, tape to the counter with a piece of paper underneath, and let them go to town, without having to worry about the mess it'll make.  -I- loved this one too.  

We used primary colors, so we got to see how they mixed and made new colors.  We just left them taped to the counter, so they can come back and play any time they feel like it.  Then, when they get tired of these colors, we'll switch to something new.  Maybe next time we'll make tertiary colors with a primary and a secondary in each bag.


21.5.12

weekend project

Pay day finally arrived and I ran out for some fabric to make the cut chenille blanket.  I started on Saturday and finished on Sunday.  I couldn't rest until it was done.  I love my new blanket and, just as I thought, I want to make more in every color of the rainbow.  I just love the texture.  The fabric I chose wouldn't have been my first choice, but I still love how it turned out.  It's this orange and yellow ikat pattern.  And for the three layers of cotton flannel, I chose a pale yellow, a gray, and a peach and white polka dot flannel.  


I had some helpers, too.  Colse wanted to help cut the cotton flannel layers and Griff wanted to push the foot pedal under my sewing table.  A lot of  "go". . . "stop!". . . "go". . . "stop!"  Eventually I kicked him out and took over.   ; )    


I have to say, I started the cutting process with fabric scissors and felt like I might go crazy.  I looked in my sewing box and found this tool that I didn't even know I had (the one Colson is using in the picture above).  I don't think I had ever used it before, but it saved my life!  Sooooooo much easier.  Sewing the lines took somewhere around 5 hours, and the cutting (with the tool) took about 45 minutes.  Phew!  I don't think I could have handled another five hours of cutting!  I have the Clover Slash Rotary Cutter.  Trust me, you'll want something like this if you make this blanket.  The tutorial I followed suggested a chenille cutter.  I've never used one of those but I'm sure they're similar.  

 Almost done, just need to wash it:


And the finished product.  So snuggly.  The kids watched their cartoon all cuddled under it this morning.  Can't wait for the next one.  


10.5.12

Let the Creative Juices Flow

I have the pleasure of joining a few friends in throwing a baby shower tonight.  I'm sure there will be some pictures soon.  : )

I dragged my feet on brainstorming for a long while, because my Texas trip came first, and I didn't want to stress about it while I was on vacation.  Also, I haven't DONE much, creatively speaking, in quite some time, and I know what happens when I open THAT door. . . .

It becomes my life and I have a hard time taking care of my other responsibilities.  Soooooo, I waited until a couple days ago, to really get started on party planning, so that I'd only be stressed for a minute.  It totally worked!  BUT, I kid you not, five minutes into my internet research, I found this GORGEOUS blanket and now THAT'S going to fill my every thought until it's complete.  -sigh-  I just can't win.


  If you don't think this is pretty, you're crazy.  Or maybe I'M crazy.  I couldn't take my eyes off this thing and couldn't stop talking my husband's ears off, about how I want to make it and NEED to go to the fabric store.  He, in turn, informed me that I can't just go off buying fabric, until his next pay day.  My poor, poor, patient husband.  I love that man.

SO, pay day is slowly approaching, and I can't wait to go shopping for some beautiful fabric to make a beautiful blanket.  And hopefully it's easy enough to start whipping them up.  I plan to fill a closet with all kinds of sizes and colors.

directions for the blanket, found at Aesthetic Nest.

5.12.11

5 little monkeys swingin' in a tree. . . .

I was invited to a baby shower for twins, and I knew I'd crochet a couple of hats (because that's just what I always do for baby showers) but I wanted a little something more, so I did what I always do. . . .I called Sarah. She never fails to help me out when I need advice. We make a good team, she and I. SHE makes things, tells ME about them, then I copy her, and I post about them! It all works out. She taught herself to crochet and that's why I started. She learned to knit so now I want to learn. Basically I'm the little sister who's always trying to be like my big sis. She's usually the inspiration behind my projects and I think she needs more credit.

Back to my story.

So I called Sare and she directed me to some adorable little finger puppets on Homemade by Jill, which she had already made for a friend AND for her own little ones.

I LOVE them. They're so cute. I only had time to make them for my friend, but I DO also want to make some for my children. Christmas present?


I printed out the cute little monkey song and made 5 little monkeys and a crocodile (no pics of the croc though. oops!)

I also made a little bag to put them in. I REALLY just made it up, but if you've never made anything like this before and need a little help, surprise surprise, I was looking through our posts that hadn't been published yet and SARAH had already written one up with these links:


The piece of fabric I used was 20 in. x 10 3/4 in. in case anyone's curious. I only used that one piece for the whole project, so the finished bag was half that size. Sorry I didn't make a tutorial but check the link above for some helpful info.


The finished bag.

And I made each monkey face a little different than the last, just for fun.

the end.

ps did you enter the giveway yet?

15.8.11

What a *SUPER* Day!

Carrie made our nephews super capes for Christmas a couple years ago and they've been a big hit. Jack dons his daily, so I decided little miss Addie needed to be able to be 'super' too. I asked what colors she wanted but all she would say was pink. So one side of the cape is pink, and the other is patterned after Tinkerbell colors (her yellow hair, green dress, and white puff on her shoes).
I just made up a shape and cut out identical pieces from each color (I just used some cheap broadcloth). Then I sewed a super symbol (made out of felt) to each.

Then, with right sides facing, I sewed them together (leaving an open space for turning). I flipped it right side out and stitched around the edge again to make it look finished. I added Velcro to the neck and it called it done!

The kids had a blast! There's no time for a posed shot when there are so many 'super' things that need to be done!

2.6.11

New Old Baby Stroller

My little girl loves babies. She actually cried in Toy Story 3 when 'Big Baby' falls of the back of the truck into the street. Needless to say, her doll stroller gets used quite a lot! However, before she really got to use it for dolls the kids used take turns pushing each other around.
The fabric was not made to support their weight, and it broke. It's year and a half later and I FINALLY got around to making a new insert. We all love it! I took a bunch of close up pics so I'd be sure to remember how it all was supposed to go together and then I cut it all apart and used it as my pattern.

I made mine out of canvas because I thought it would be able to support more weight (not that I'm encouraging my kids to use this as their own stroller, I just know its gonna happen whether I want it to or not) and because it was a remnant I found on sale!
This baby will definitely get a lot of use!!

22.4.11

Ruffle Fabric

I know, I know, every one's already done ruffle fabric. Well I finally tried it out so now I want to blog about it too! I found this adorable dress while perusing blogs and fell in love. Then I read the tutorial and fell in love all over again. 20 minutes! Seriously?! So I ventured over to Ruffle Fabric and bought me a yard (ps - the fabric got to my doorstep 3 days later!).

Me Sew Crazy...How much do I love this site?! She makes the cutest little things for her daughters. This dress may be the first thing I tried from her site, but it won't be the last!

I just followed the tutorial that Jessica laid out. I have to admit, my dress took far longer than 20 minutes. I'm still really new to sewing and super timid around my machine. That being said, I made the dress! I wanted Addie to try it on to make sure it looked right and she wanted no part of it. However, when I finally got it on her she wouldn't take it off! She just walked around the house modeling and twirling for everyone to see. There was so much fabric leftover I decided to make one for Ellie baby too!

For Ellie's, I just used one of her dresses as a pattern. I folded it in half, placed it on the fabric's fold and cut the front pattern piece. I readjusted the fabric, flipped the dress over, placed it on the fold and cut out the back pattern piece. I sewed it together and voila!
A little note for other beginners who are as impatient as I am. I stitched around the neck far too tight, and it resulted in some curling. Next time, I would definitely take the time to test some things out on a scrap piece first.

I loved the little belt Jessica made for her daughter's dress, but I didn't have anything like that to match the coral fabric I chose. So I looked through my scraps and found some antique white fabric and whipped up an elastic belt. I also think this one by Ruffles and Stuff would be beautiful. Then I added a rolled fabric flower. You could really do anything...just have fun!

7.2.11

Pillowcase dress

I used some of my Wal-Mart fabric to make a pillowcase dress for baby P. It was pretty easy, despite my boys breaking my seam ripper. . . . for the SECOND TIME.

sigh.


I guess I'm on a doily kick. I sewed one on because I thought it was a good complement to the fabric's vintage quality.

Pillowcase dresses appeal to me for many reasons.

1) they're extremely easy to make (imagine how much easier they'd be if you actually use a pillowcase!),

2) they're extremely cute,

3) they're extremely versatile. Right now it's cold out, so I put a long sleeve shirt under it. In the Spring she can wear it without anything under, as a light summer dress. And, as she gets bigger, she can wear it as a shirt, with skinny jeans or shorts.

and 4) you can be creative. I love a good reason to use my creativity. Use bias tape OR ribbon for the ties, you could add lace or ric rac to trim the bottom, you can add buttons, ribbon, doilies, or fabric flowers to the dress, you can use a print OR a solid color. Endless possibilities.

I used a couple different tutorials, from Freshly Picked and The Needle and the Damage Done.

If you want to try this, here's a tip for when you attach the elastic:

1) measure your baby's collarbone
2) mark the elastic (don't cut it yet)
3) feed it through the hole with a safety pin
4) sew next to your safety pin, to attach the elastic
5) pull the safety pin to make sure the elastic is now sewn to the fabric
6) if it IS, take the safety pin off (still don't cut your elastic yet)
7) now pull the fabric to the side until you see where you marked the elastic.
8) sew at the mark
9) once again, pull the elastic to make sure it's attached
10) NOW, cut your elastic

This was the only place that gave me trouble. I didn't catch the elastic and it was pretty difficult. . . .you know, not having a seam ripper and all.

18.1.11

Scarf slash Shawl


I want to try making this Anthropologie-inspired scarf/shawl. The tutorial can be found in the Pretty Ditty archives.

18.7.10

PETUNIA + POPPY are pregnant!

That's right, we're both pregnant! Just a few weeks apart, too. Does that justify the two month gap between posts?

Having a bun in the oven makes your mind go crazy for all things baby. The first thing we wanted to tackle was baby bedding. We took a trip to the thrift store and bought this vintage floral sheet for just $2.
This was such an easy project!

I started by ironing it. Then I cut it into a 44''x66'' rectangle. This should fit a standard crib mattress.
I cut an 8''x8'' square from all four corners and then sewed each individual corner shut with a 1/2 inch seam- right sides together (I started with a 1/4 inch seam and then changed my mind and switched to a 1/2 inch. That's why there are two seams in the pic below).
Now turn it right side out and you've basically got your sheet made. All that's left is the elastic.
I folded the edge down about 1/2 an inch, ironed it, and sewed all the way around with a zig zag stitch.
Then I added the elastic. I used the smallest elastic I could find (1/4 inch). Mine was 8 yards long and I used maybe half of it. I started at the seam on one of the corners and worked my way around the whole sheet with a zig zag stitch, stretching the elastic as I sewed.
This was SO easy, I'm sure I'll be making many more in the near future. My end cost was about $2.50! And I have more fabric and elastic left over for other projects (maybe another elastic-waist skirt?)
Not bad, not bad at all.
On the agenda for the near future:

12.4.10

Shirt Re-fashion

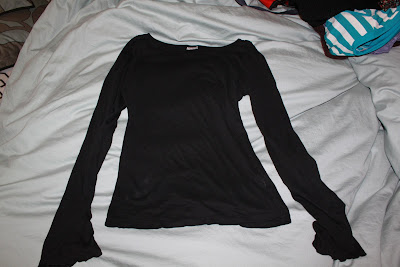
I re-fashioned this shirt (which I have had for years, but never wear). . . .


into this. . . .


I used these instrucions. Mine is a little different. My shirt started with a boatneck, which I didn't like as much, so I played round with it a little and made it more of a scoop.


The ruffles on my shirt also don't lie flat like the tutorial. When I follow tutorials, I like to keep in mind that I don't need to follow the directions exactly. If something else comes to mind, I do it.


SO. . . .like she says in the tutorial, when you cut the sleeves off and open them up, they're only as long as the shirt and you WANT them to be about 1 1/2 the length of the shirt.
To fix this, after opening the sleeves up (I DID cut off the curved side, unlike her, which is shown in the pic above, before I cut it off), I cut each of them in half lengthwise, then lined one of the short ends together and sewed across.
So then I had two looooong strips (double the length of the shirt). I cut a little off the ends to make them about 1 1/2 the length of the shirt. Trim the sides so that one strip is a little wider than the other. Then I followed the directions the rest of the way.
I don't know if any of that made any sense, but that's what I did. : )


I LOVE the result. I get the feeling this shirt will get a lot more attention from me, from now on.